Welcome
To
eSkooly ultimate Education ERP
Ultimate solution for your school to run modern way
By
eSkooly
Email:pro@eskooly.com
Web: pro.eskooly.com
We would like to thank you for purchasing eSkooly School! We are very pleased you have chosen eSkooly School for your institution, you will not be disappointed! Before you get started, please be sure to always check out these documentation files. We outline all kinds of good information, and provide you with all the details you need to use eSkooly School. eSkooly School can be used with any school, college, university, training/coaching institute.
If you are unable to find your answer here in our documentation, watch our Video Tutorials, you can also visit our Help & Support. Chances are your question or issue have been brought up already and the answer is waiting to be found. If you are unable to find it anywhere, then please go our Support section and open a new Support Ticket with all the details we need. Please be sure to include your site URL as well. Thank you, we hope you enjoy using eSkooly School!
System Requirements
eSkooly System Requirements
The Laravel framework has a few system requirements. All of these requirements are satisfied by the Laravel Homestead virtual machine, so it's highly recommended that you use Homestead as your local Laravel development environment.
However, if you are not using Homestead, you will need to make sure your server meets the following requirements:
- PHP >= 7.1. 3
- OpenSSL PHP Extension
- PDO PHP Extension
- Mbstring PHP Extension
- Tokenizer PHP Extension
- XML PHP Extension
- Ctype PHP Extension
- JSON PHP Extension
- BCMath PHP Extension
* In most hosting accounts, these extensions are enabled by default. But you should check with your hosting provider.
After installation eSkooly School to work properly, you must make few directories/files writable. Below are a list of directories/files you should ensure that have write permissions.
- installation_dir/storage/app/
- installation_dir/storage/framework/cache
- installation_dir/storage/framework/session
- installation_dir/storage/framework/testing
- installation_dir/public/uploads/
eSkooly School Installation
Database and database user creation on Server
Log into your cPanel.

Click the MySQL Database Wizard under the Databases heading.

Next to New Database enter a name for your database and click Next Step.

Next to Username enter a username.Enter a password next to Password, enter it again for Password (Again) and then click Create User.

On the next page, you'll assign privileges for the user to the database. Check the box next to All Privileges and then click Next Step.

Upload the package to your host
- Download the package from 2checkout or from pro.eskooly.com Website
- Unzip the package and you'll find the following contents
- Documentation
- upload.zip

Upload file "upload.zip" to your host inside the desired location using cPanel File Manager

After upload is completed, Right click on the package and select Extract. That will extract the zipped file contents

Configure Schoex with Database credentials
Use the file manager to edit the file in the path .env
Add Database configuration in the file as described in the below image

Adjust the folders Permissions
- Change the permissions of uploads folder and all it's contents (Files & Folders ) to 777
- Change the permissions of storage folder and all it's contents (Files & Folders ) to 777
Start the installation
- Use your browser to eSkooly install Script . Type in browser your application location followed by /install. and hit Start Installation

Checking Codecanyon Credentials. If all thing is ok Press Next Step

Checking Database configuration and Files & Folders permissions. If all thing is ok Press Next Step

Type in Administrator Details, Site Settings, Default Academic Year & License Code. Then Press Next Step

Installation complete

Get Support
Get Support from eSkooly
To get Technical/Sales support. You must create eSkooly Account first.

Dashboard
eSkooly Dashboard

1 & 3. Dashboard
At the top menu of left sidebar is Dashboard. There are several view port in dashboard. we can see the number of students, teachers and staff etc. at a glance. Summary of the Income and Expenses is very important for ERP system. After login a user can see the update for that day.
2. Website
From dashboard a user can easily return to own website home page.
4. Reports
Reports section is very important in this School Management ERP. You can go to report section from all over the system.
5. Languag
eSkooly delivered to you equiped with diffrent languages : English, Arabic (RTL), French, Dutch, German, Hindi, Italian, Turkish,Russian, Spanish & Portuguse etc. You can also add laguage with your own customization.
6. Notification
If Administrators or Teachers set any task for student, then it will automaticaly send notifications to Teachers, Students (All students or specify class's students) and parents also you can track sent messages .
7. Profile
The user can see their profile, change their existing password. Logout button at the bottom of this profile section.
8. Number of students
The user can see their profile, change their existing password. Logout button at the bottom of this profile section.


1. Dashboard
At the top menu of left sidebar is Dashboard. There are several view port in dashboard. we can see the number of students, teachers and staff etc. at a glance. Summary of the Income and Expenses is very important for ERP system. After login a user can see the update for that day.
Admission Query
eSkooly Admission Query


1. Add Admission Query
Super Admin can add admission query.In the admission query all the details information of query should have to submit.
2. Search Admission Query
Admission query can be searched through certain date to date, information source and which are active or not.
3. Select Actions
In the actions option,if super admin wants, he can add next follow up query,edit and delete of a particular query.
4. Follow up Admission Query
If needed several follow up admission query can be added.That will be also listed in the follow up list and if he will want, he can delete it.
Visitor Book
eSkooly Visitor Book

1. Add Visitor
For store how much visitors visit everyday and their information, super admin can add their detail information and that is shown in the visitor list.
2. Select Actions
In the visitor list, edit, delete and download visitor information is possible.
Complaint
eSkooly Complaint

1. Add Complaint
If anyone complain that can be listed by adding the complaint. Complaint includes who complains, which type of complaint is it etc.
2. Select Actions
In the complaint list several actions are included which are view the complaint details, edit and delete.
Postal Receive
eSkooly Postal Receive

1. Add Postal Receive
Super admin can add which postal are received. Here includes postal comes from and where it will go and several things.
2. Select Actions
Super admin can edit, delete and download the postal receive information.
Postal Dispatch
eSkooly Postal Dispatch

1. Add Postal Dispatch
The postal where will go, it can be added by super admin. Sender and receiver information are includes here.
2. Select Actions
Super admin can edit, delete and download the postal dispatch information.
Phone Call Log
eSkooly Phone Call Log

1. Add Phone Call
Super admin can able to add the phone call log. In this call log, All incoming, outgoing and it's call duration, date, next follow up date and all the details information are included.
2. Select Actions
Super admin can edit, delete the phone call log information.
Admin Setup
eSkooly Admin Setup

1. Add Admin Setup
In the admin setup, super admin can add different criteria which are sorted by their type. The types are source, purpose, complaint type, reference.
2. Select Actions
The data list can be deleted and edited by super admin.
Student Certificate
eSkooly Student Certificate

1. Add Student Certificate
Super admin can add student certificate. Certificate name and background image is mandatory field in this section.
2. Select Actions
The Student Certificate list can be viewed, deleted and edited by super admin.
Generate Certificate
eSkooly Generate Certificate

1. Search Generate Certificate
To search student list, super admin should have to select class name, section name and which certificate he wants to generate.
2. Student List
Student ID Card
eSkooly Student ID Card
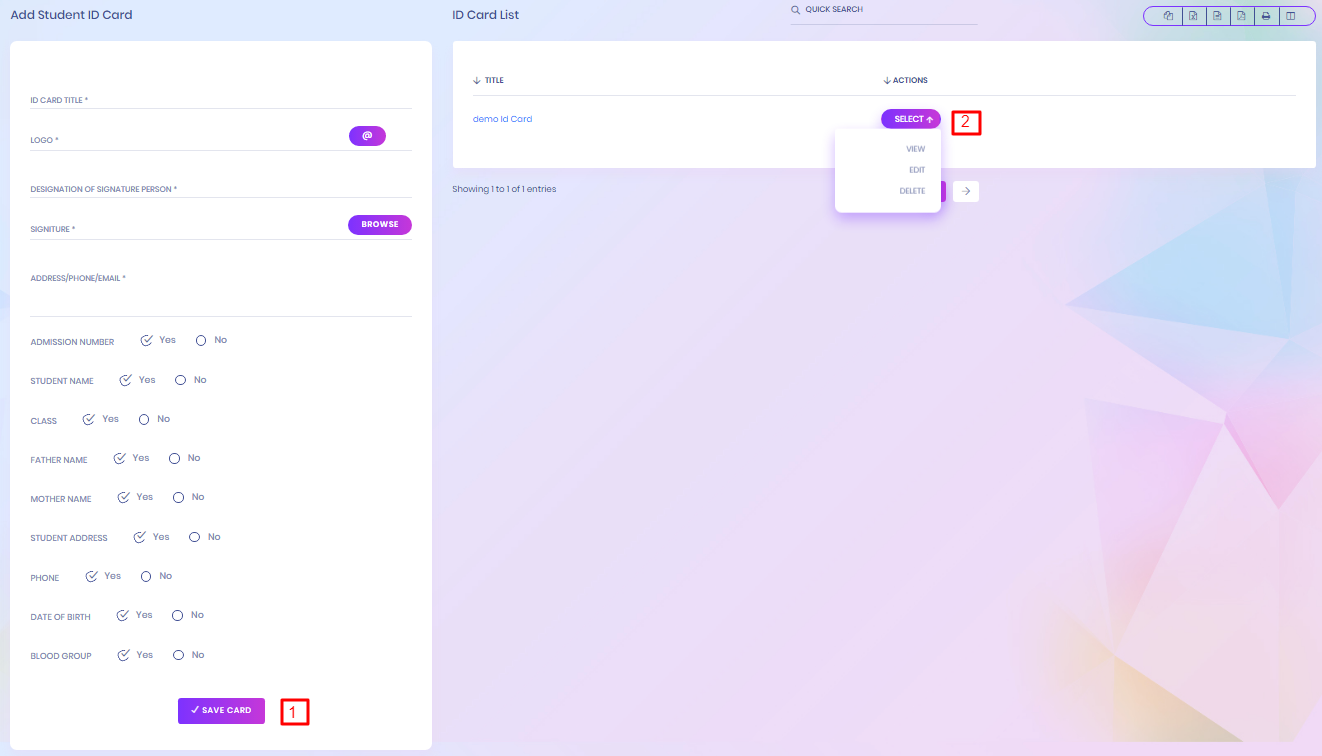
1. Add Student ID Card
To add student id card, id card title, logo of institution, designation of the person whom id card will generate, signature of the person is must needed to include.
2. Select Actions
The Student id card list can be viewed, deleted and edited by super admin.
Generate ID Card
eSkooly Generate ID Card

1. Search Generate ID Card
To search student list, super admin should have to select class name, section name and which id card he wants to generate.
2. Student List
General Setting
eSkooly General Setting

1. Upload Logo
Upload Institution logo
2. Change Logo
After uploading Institution logo it will publish
3. General Settings View
Summary of General Settings View

4. Upload Form of General Settings
You can update General Settings according to your institution
5. Chnage Currency
You can change currency as your demand. All kind of currency is available in this system.
6. Chnage Language
You can choose language as your demand. If your language is not available, the you have to add language into your system from "system-setting>language-settings". After adding language, it is required to setup and then you have to make it default.
Email Setting
eSkooly Email Setting

You have to configuration email.
Payment Method Settings
eSkooly Payment Method Settings

1. Select Payment Method
PayPal and Stripe payment method implemented. You can configuration one of them.
2. Update Payment Method
To enabling online payment in Parent Panel and Student Panel update your payment gateway account details for this, go to System Settings > Payment Methods select your appropriate payment gateway and add you payment gateway account details then click on save button and enable it from right side box.
3. Switch Payment Method
The administrator can switch within payment method

4. Stripe Payment Method
Stripe is the premier option for online credit card processing; it’s also the most popular premium payment gateway for Easy Digital Downloads – and it’s our preferred option!
Adding Stripe To Your Create Account. You will need to add Stripe as a payment gateway option to your Create account.
- Log in to your Create account
- Click "Shop" from the Top menu
- Click "Shop Settings" from the left-hand menu
- Click "Payment Gateways"
- Click "Add New Gateway"
- Chose "Stripe"
- Click "Save Changes" to add the gateway
Testing Stripe With Your Create Website
- Log in to your Stripe account
- Click "Account" from the top right hand of the page
- Click "Account Settings"
- Click the "API Keys" from the top tabs
- Here, you will need the "Test Secret Key" and "Test Publishable Key"

Role Permission
eSkooly Role Permission

1. Role Permission
The administrator can add role and assign their permission
2. Select
The administrator can edit or delete role and assign their permission

3. Role Permission Assign
The administrator can assign their permission
Roles Permissions- Go to System Settings > Roles Permissions here we can create different Roles for staff users and then assign different user permission to this Role. To add new role enter Role Name then click on Save button all existing roles can be see from right side of this page. By default in eSkooly School you will get 6 user roles SuperAdmin, Admin, Teacher, Accountant, Librarian, Receptionist. You can edit name or permission of these roles except SuperAdmin. To assign permission click on Assign Permission button from Action column. At this page you can see Module wise different Features and their different Permissions. Carefully assign different permissions on roles. After assigning permission, check where it is effecting in system. There are 4 types of permissions present here View, Add, Edit and Delete. Here note that if you are assigning Add/Edit or Delete permission then View permission should be given obviously if you have not given View permission then system can behave inconsistent so in best practice if you are giving Add/Edit/Delete any one permission then give View permission too.
Base Setup
eSkooly Base Setup

1. Base Setup
Administrator can add gender, religion, and blood group.
Academic Year
eSkooly Academic Year

1. Academic Year
Administrator can add academic year.
Session
eSkooly Session

1. Session
You can manage session. You have to go System Setting > Session. You can add new session, edit & delete.
Holiday
eSkooly Holiday

1. Holiday
Administrator can manage holiday. You have to go System Setting > Holiday. You can add new holiday, edit & delete. It will show in dashboard calendar.
2. Manage Holiday
Administrator can edit & delete. It will show in dashboard calendar.
Sms Settings
Sms Settings

1. Sms Settings
You can seletect sms sender service provider
Clickatell SMS Platform is a powerful, fully scalable communication system that enables you to manage your business communication more effectively. With an infrastructure covering over 220 territories and 1 000+ networks, your business can now connect with customers in every corner of the world.

2. Sms Configuration
You can send sms to the students, teachers, & parents. You have to purchase package for sending message. There are two already implemented.

Weekend
Weekend

1. Weekend
You can edit weekend.
2. Checked Weekend
If you want to set satureday is weekend day, then you have to edit that day and checked as weekend and update your data.
Language Settings
Language Settings

1. Language
You can add multiple languages. Select language and add into system.
2. Default
You can make it default. After making default, system will converted into default language
3. Language Setup
You can setup your custom language

1. Chnage language Phrases
You can change phrases according to your language
Backup
Backup

1. Backup
You can create backup from your system, You can also resote data from your local pc.
2. Images Backup
You can create all images backup from your system, You can also download into your local PC for safety.
3. Whole System Backup
You can create whole system backup.
4. Database Backup
You can also create database backup and download, restore, and delete
Update System
Update System

Update System
If update version is available, then you can upgrade from here.
Dormitory Rooms
eSkooly Dormitory Rooms

1. Add Dormitory Rooms
Super admin can add dormitory Rooms which should have to include dormitory name, room number, room type, bed number and it's cost.
2. Select Action
In the dormitory room list, super admin can able to edit and delete the dormitory room information.
Dormitory List
eSkooly Dormitory List

1. Add Dormitory
For adding dormitory super admin need to add dormitory name,type and how much allotment are possible in this dormitory.
2. Select Actions
Edit and delete option are permitted for super admin.
Room Type
eSkooly Room Type

1. Add Room Type
Which kinds of rooms are available in the dormitory, super admin can add this.
1. Select Actions
Super admin can edit and delete the room type list.
Student Dormitory Report
eSkooly Student Dormitory Report
1. Search Student Dormitory Report
For searching student dormitory list class, section and dormitory name should have to select.
Transport Route
eSkooly Transport Route

Transport Route
This module has 3 sections -
- Routes
- Vehicles
- Assign Vehicle
- Student Transport Report
First we will add Routes then add Vehicles then Assign Vehicle on Routes then check Student Transport Report.
Routes- Go to Transport > Routes enter Route Title, Fare & click Save button. All the routes can be see right side at this page.
Go to Transport > Vehicles enter Vehicle No, Vehicle Model, Year Made, Driver Name, Driver License, Driver Contact, Note & click Save button. All the vehicles can be see right side at this page. Student Transport Report- Go to Student Information > Student Transport Report here you can view all students list who has availed transport facility.
Vehicle
eSkooly Vehicle

Assign Vehicle
eSkooly Assign Vehicle

Student Transport Report
eSkooly Student Transport Report
Item Category
eSkooly Item Category

1. Add Item Category
To add item category super admin should add category name. By Clicking Select in action column super admin can get the option of delete and edit.
Item List
eSkooly Item List

1. Add Item List
In Item List Submodule, to submit an item need to add item name, select an item category which is added in item category submodule.
2. Select action
Super admin can edit and delete the item list.
Item Store
eSkooly Item Store

1. Add Item Store
Store name is essential for adding item store and store number is the identity of the store.
2. Select action
Super admin can edit and delete the item store.
Supplier
eSkooly Supplier

1. Add Supplier
For adding supplier, supplier's company name, name, mobile number, email address is needed to submit.
2. Select Action
Super admin can edit and delete the supplier list.
Item Receive
eSkooly Item Receive

1. Receive Details
At first select supplier which is come from the supplier list that is added by super admin. Select the available store or warehouse which also added by super admin in the item store submodule. Then need to add the reference number, receive date.
After that select the item from the item list which is listed in item list submodule, put it's unit price, quantity. Sub total will show the individual item's total price. After adding all sub total the final result will be shown.
If check the full paid option no due will be shown. If not, then put the amount in total paid field. If it's meet up the total due will zero, if not then due or surplus amount will show in the total due field. Payment method can also be selected in this operation.
2. Add Item
By just clicking the add button, new item will be added in the calculation process.
Item Receive List
eSkooly Item Receive List


1. Paid and Unpaid Status
In the item receive list paid or unpaid status is shown. If payment is complete then the status show paid, if not then show unpaid
2. Select Actions
In this list, view purchase details, edit and delete the list, if unpaid then add payment and view payment are included in action.
3. New Item Receive
By clicking the new item receive button, easily can add a new item receive.
4. Purchase Receipt
To see the purchase receipt, just click the view option in the action column for individual item receive then can possible to see the purchase detail information.
5. Add Payment
If any amount of due remains then we can complete the payment by clicking the add payment in the action column. After that we can fill up the payment through a particular payment method.In this case of operation reference number should be added.
Item Sell List
eSkooly Item Sell List


1. Paid and Unpaid Status
In the item sell list paid or unpaid status is shown. If payment is complete then the status show paid, if not then show unpaid
2. Select Actions
Action column in this list, super admin can able to see sell details in view option, edit and delete the list and if unpaid then able to add payment and view payment.
3. New Item Sell
By clicking the new item sell button, easily can add a new item's sell information.
4. Item Sell
At first select the person who buy the item, whom are added by super admin. Then need to add the reference number, receive date of selling.
After that select the item from the item list which is listed in item list submodule, put it's unit price, quantity. Sub total will show the individual item's total price. After adding all sub total the final result will be shown.
If check the full paid option no due will be shown. If not, then put the amount in total paid field. If it's meet up the total due will zero, if not then due or surplus amount will show in the total due field. Payment method can also be selected in this operation. After done the submission the sell information will be listed in item sell list.
Issue Item
eSkooly Issue Item

1. Issue a Item
Which item is issued for which person should have to add in the begin of the form. For Submission which kind of user,his name and if he is studentthen his class,section also mandatory. Issue and return date, item category, item name and it's quantity should have to submit before final submission.
After submission the issued item list is shown here. If super admin wants, he can return the issued item. Status will show which item is issued and return.
Add Book
eSkooly Add Book

1. Add Book
Super admin can add book which is available in the library. For adding book, book title, category, subject is mandatory. For proper book details information need to fill up all the field in this form.
Book List
eSkooly Book List

1. Book List
All the books which are available in the library are shown in this book list.Super Admin can edit and delete the book information if he wants.Book Categories
eSkooly Book Categories

1. Book Categories
If Super admin wants he can add new book category in this submodule. All the book category list is shown in Category list.
Add Member
eSkooly Add Member

1. Add Member
Super admin can add new library member. In this case member type and member id is necessary to fill up.
2. Cancel member list
Library member lists are shown in member list. Super admin can cancel the member if he wants.
Issue Books
eSkooly Issue Books


1. Issue Books
All the members of the library are shown in this list. Where super admin can issue or return book/books to him.
2. Issue or Return Books
By clicking the Issue/Return Books super admin can able to issue book to the library member and if want he can return book.
Issued Book List
eSkooly Issued Book List

1. Search Issued books
By selecting book name or book id or subject super admin can see the issued book list.
Notice Board
eSkooly Notice Board

1. All notices
Super admin can see all the notices which is select for.
2. Add notice
super admin can add new notice by clicking the add notice button.
Send Message
eSkooly Send Message

1. Add notices
To add new notice at first type the notice title, then write the message content. Notice date and publication date should have to select. Select the notice viewer in the message to section.
By clicking the Notice board button in the top-right then can able to go notice board list.
Send Email
eSkooly Send Email


1. Send email or SMS (Group)
Super admin can send email or sms by checking in send through check box. Title and description is also mandatory field.
If he wants to send this to several receiver then he can select several receiver in the group section.
2. Send email or SMS (Individual)
If he wants to send this to individual receiver or certain role receiver then he can select role of the receiver and select the name or names in the individual section.
3. Send email or SMS (Class)
If he wants to send this to particular class students then he can select a class and certain section in the class section.
Email / Sms Log List
eSkooly Email / Sms Log List

1. Email / Sms Log List
All the email and sms which is send that are listed here. If wants to send new email or sms then just click the Send Email/Sms button.
In the list, email or sms receiver list are shown. This are group, individual and class.
Event List
eSkooly Event List

1. Add Event
To add event, event title, start date, end date and description are needed. The event list will show all the event which are added.In the list, event can be edit and delete are possible.
Add Homework
eSkooly Add Homework


1. Add Homework
To add homework, class, section, subjects, date, submission date, marks and description are needed to submit.
2. Select Action
In the action column, evaluation, edit and delete options are include.
3. Search Homework list
To search homework list, class, section, subject are needed to select.
4. Add homework
By clicking the add homework super admin can add new homework.
5. Evaluation homework
Super admin can evaluate the homework by clicking the evaluation option in action column.In evaluation homework, students are evaluated by marks, comments, homework status.
6. Evaluation Date
Evaluation date should have to select before evaluation page submit.
Homework Evaluation Report
eSkooly Homework Evaluation Report


1. Search Homework Evaluation Report
To search homework evaluation report, class, section, subjects should have to select.
2. Select Action
Homework evaluation report list are show the search result. By clicking view option full evaluation of a particular home can be seen.
Class Routine
eSkooly Class Routine


1. Add Class routine
In the class routine submodule, by selecting the class and section super admin can see the particular class routine. Where by clicking on the (+) symbol admin can assign the class routine.
2. Assigned Class routine
Assigned class for particular day and period are shown on the class routine list.
3. Create Class routine
To create class routine just click on the particular period of a day. Here have to select subject, teacher and class room.
Assign Subject
eSkooly Assign Subject


1. Search Assigned Subject
Select class and section for searching assigned subjects for particular class and it's individual section.
2. Assigned Subject List
In this list, particular subjects and it's assigned course teachers are shown. If assign new subjects just click the right-top assign Subject button.
3. Search Assign Subject Create
For assign subjects list, search by selecting the class and section.
4. Assign Subject Create
For assign subject select the teacher in the teacher section.By clicking the delete button, subject will be deleted.By clicking the save button the subjects will assigned.
Assign Class Teacher
eSkooly Assign Class Teacher

4. Assign Class Teacher
For assigning class routine, class, section and teachers should have to select. The Assigned class teacher list will show in the Class Teacher List. Here teacher list can be edited and deleted.
Subject
eSkooly Subject

1. Add Subject
To add subject, the subject name,the subject code should be added and check the theory or practical which type of subject is it.
Subject list can be edited and deleted by the super admin.
Class
eSkooly Class

1. Add Class
To add Class, the class name and section or sections should be added.
Class list can be edited and deleted by the super admin.
Sections
eSkooly Sections

1. Add Section
To add section, the section name should be added.
2. Select Section
Section list can be edited and deleted by the super admin.
Class Room
eSkooly Class Room

1. Add Class Room
To add class room, room number and capacity should be added.
2. Select Section
Class room list can be edited and deleted by the super admin.
Class & Exam Time Setup
eSkooly Class & Exam Time Setup

1. Add Time
To add time, time type, period, start and ending time should be added.
2. Select Section
Time list can be edited and deleted by the super admin.
Add Exam
eSkooly Add Exam

1. Add Examination Name
Super admin can add examination name. He has been allowed to edit and delete the examination name.
2. Exam Setup
By clicking the Exam Setup button super admin can enter the exam setup page.
Exam
eSkooly Exam


1. Add Exam
To exam setup, firstly select the class or classes then select the corresponding section or sections,secondly select the particular subjects or subject then select the exam type. Total mark of the particular exam should have to setup in the exam mark field.
To distribute the exam marks, We have to identify the how much marks in which exam category, like written exam has 70, class test has 20, homework has 10 and the total marks will show in Total field. The marks can't cross the exam marks.
2. Exam List
In the exam list, exam's all information are shown in details. Super admin can delete the exam list.
Exam Schedule
eSkooly Exam Schedule

1. Add Exam Schedule
By Clicking the right-top button add exam schedule super admin enter the exam setup schedule page.
2. Search Exam Schedule
To search the exam schedule super admin have to select the exam name, class and section. The assigned exam routine is shown in the exam schedule section.

3. Search for Set Exam Schedule
After clicking the add exam schedule button super will enter Exam Schedule create page. In this page, by selecting the exam name, class and section super admin will get the set exam schedule section.
4. Assign Exam Schedule
To assign exam schedule just click the (+) symbol, then super admin will get the create exam routine modal.
5. Assigned exam Schedule
If any exam schedule is assigned then the assigned exam schedule is shown in this list.

6. Create Exam Routine
just select the date and the room number super admin can setup the exam routine for particular subject in particular date and time.
Marks Register
eSkooly Marks Register

1. Mark Register
In the mark register submodule, super admin can see the mark registered list by searching through selecting the exam name,class and section. By clicking the right-top button add button super admin can enter the fills marks page.
To search the certain fill up marks list, super admin have to select exam name, class, section and subject.
2. fill up the Marks
In the Fill up marks lists, All the particular mark sections are included like class test marks, homework marks, written exam etc. If anyone was absent in the examination then just check the is absent. After distribute all marks by submit the save button then marks will be registered.
Exam Attendance
eSkooly Exam Attendance


1. Attendance Create
By clicking the exam attendance button, super admin can able to enter the exam attendance setup page.
2. Search Exam Attendance
To search the certain exam attendance have to select the exam name, class, section and subject.
3. Attendance Status
Exam attendance list will show the the search result. in this list, attendance column will show which student was present or absent in this particular exam.
4. Setup Exam Attendance
To get the desire exams attendance setup section just select the exam name, class, section and subject. in this attendance setup section, super admin can check the absent or present option button.
Marks Grade
eSkooly Marks Grade

1. Add Grade
To add certain mark's grade,super admin need to add grade name,it's GPA, percentage range etc.
2. Select Section
Super admin can edit and delete the grade list.
Question Group
eSkooly Question Group

1. Add Question Group
To add question, super admin have to include the question group name.
2. Select Section
Super admin can edit and delete the question group list.
Question Bank
eSkooly Question Bank

1. Question Bank
To add question bank,super admin need to select question group,class, section, question type, question name and it's marks.
2. Select Section
Super admin can edit and delete the question bank list.
Online Exam
eSkooly Online Exam


1. Add Online Exam
To add online exam, exam title, class, section, subjects, date, start and end time, minimum percentage and the exam's instruction.
2. Publication status
In the online exam list, publication status will show the examination is published or pending
3. Select Action
Manage question, mark register, edit and delete can allow for super admin in the action column.
4. View Result
By just clicking the view result, result will be shown.
5. Save question
After clicking the manage question option,super admin can enter the question list page where admin can save the question for particular online examination.
6. view Question
Super admin can see the details of the selected question.
7. View question Modal
In this modal,Super admin can see the details of the selected question.
8. Marking
Super admin can see the marks setup list of the participant, super admin can add exam mark of the individual.
9. Result View
By clicking the view result button, super admin can see the full result sheet.
Approve Leave Request
eSkooly Approve Leave Request


1. Approve Status
In this submodule, apply leave lists are shown. Here which leave is approved or not yet that are shown in the status column.
2. Select Action
In this Action column, view/edit and delete options are includes.
3. View or Edit Leave Details
In this modal, super admin can see the detail and he change the approve status if he wants.
Apply Leave
eSkooly Apply Leave


1. My remaining leave
In this list, super admin can see his remaining days of leave, extra taken leave and the total days for a particular leave type.
2. Add Apply leave
Super admin can the apply leave, by adding the date, leave type, which date to which date, the reason etc.
3. Select Action
The leave list will show all the leaves which is available.In this list, view/edit and delete options are includes in action column.
Leave Define
eSkooly Leave Define

1. Add Leave Define
By adding the role, leave type and the days super admin can able to define the leave.
2. Select Action
The leave define list is shown all the defined leaves.In this list, edit and delete options are includes in action column.
Leave Type
eSkooly Leave Type

1. Add Leave Type
By adding the Type name and the total days super admin can able to add the leave type.
2. Select Action
The leave type list is shown all the leaves type.In this list, edit and delete options are includes in action column.
Staff List
eSkooly Staff List

1. Search Staff List
To search the staff list,staff roles or staff id or staff name have to select.
In the action column in this list, super admin can view staff details, edit and delete the records.
2. Add Staff
By clicking the add staff button, super can enter the add staff page.


3. Add Staff
To add a staff, basic info, payroll, bank info, social links and necessary documents have to include.

4. Profile
Staff has several types of information. His profile is one of them. In his profile all the personal information are shown.
By Clicking the right-top button edit, possible to enter in edit staff details page.If wants can easily edit the staff records.

5.Payroll
Payroll information of a particular staff are shown in this page.

6.Documents
How much and which documents are downloaded in his profile are shown here.

7.Timeline
Timeline information of a particular staff are shown in this page.
Staff Attendance
eSkooly Staff Attendance

1. Search Staff Attendance
To search the staff attendance list, role and date should have to select.
2. Mark Holiday
If the selected day is holiday,then by checking the mark holiday button, the day will be marked as holiday.
3. Save Attendance
After selecting the all the functionalities, just click the save attendance button and the attendance will be recorded.
Staff Attendance Report
eSkooly Staff Attendance Report

1. Search Staff Attendance Report
To search the staff attendance report,select the role, month and the year. In this list full month attendance record of a particular staff are shown.
Payroll
eSkooly Payroll

1. payroll Search
For searching the staff payroll list, just select the role,month and the year.
2. Staff List
Staff payroll list show the search result. In this list, payroll status show payroll is generated or not. If not then just clicking the generate payroll super admin can enter the generate payroll page.


3. Generate Payroll
In the generate payroll page, earning, deductions, payroll summary should have to full up when generate payroll.
Payroll Report
eSkooly Payroll Report

1. Search payroll Report
For searching the staff payroll report list, just select the role, month and the year.
2. Staff List
Staff payroll report list show the search result. In this list, payroll's all the information of staff are shown.
Profit
eSkooly Profit

1. Search Profit
For searching the Profit list, select the certain date range means which date to date wants to see the profit list.
2. profit List
profit list show the searched time's income, expense and profit list.
Income
eSkooly Income
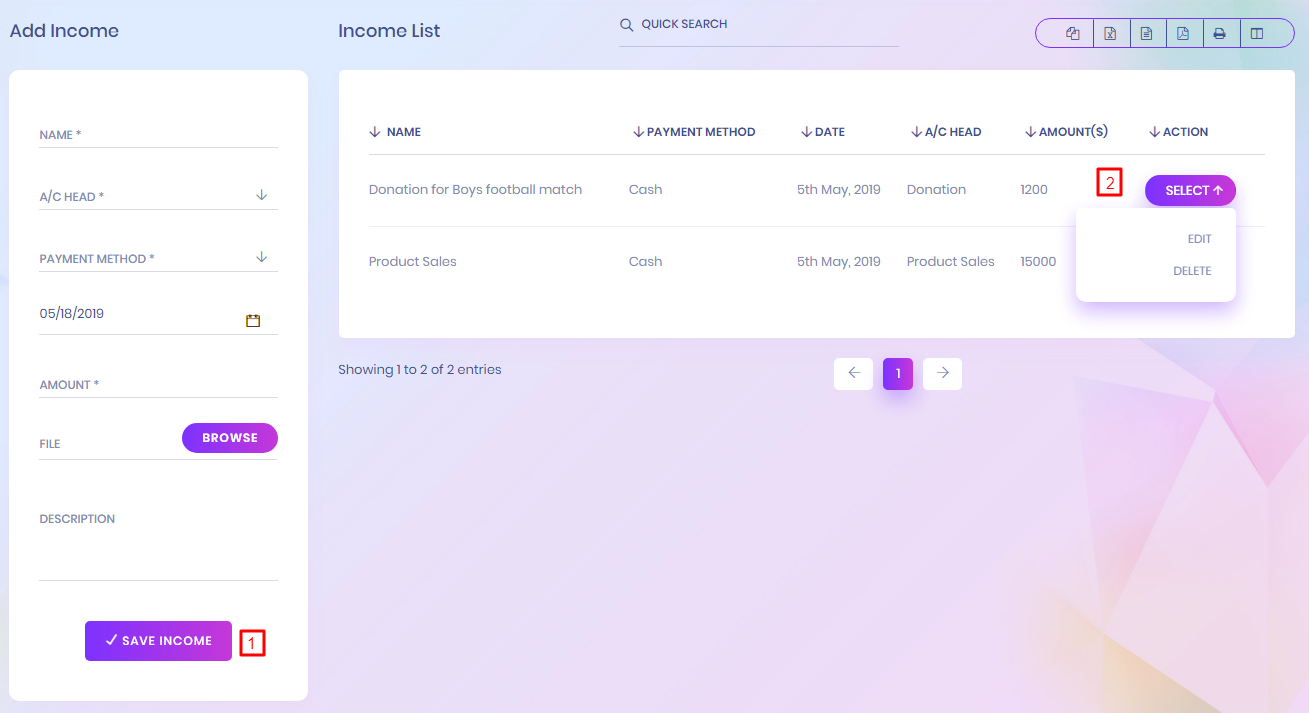
1. Add Income
To add income information income source name, account head, payment method, date and amount should have to include.
2. Select Actions
Edit and delete are includes in the action column in this list.
Expense
eSkooly Expense

1. Add Expense
To add expense information, expense source name, account head, payment method, date and amount should have to include.
2. Select Actions
Edit and delete are includes in the action column in this list.
Search Income/Expense
eSkooly Search Income/Expense

1. Search Income/Expense
To search the income or expense select certain date,select income or expense and select the income/expense name.
2. Income/Expense Result
Search result are shown in this list. Where individual information and grand total are shown.
Chart Of Account
eSkooly Chart Of Account

1. Add Chart Of Account
To add chart of account, account head and account type should have to include.
2. Select Actions
Edit and delete are includes in the action column in this list.
Payment Method
eSkooly Payment Method

1. Add Payment Method
To add payment method, method name should have to include.
2. Select Actions
Edit and delete are includes in the action column in this list.
Bank Account
eSkooly Bank Account

1. Add Bank Account
To add bank account, account name, opening balance should have to include.
2. Select Actions
Edit and delete are includes in the action column in this list.
Collect Fees
eSkooly Collect Fees

1. Search Collect Fees
For Searching the fees collection list, have to select the class and for specific search can possible to select the section and individual information.
2. Collect Fees
Search results are shown in the fees collection list. In this list, by clicking the collect fees button, super admin can enter the add fees page.

3. Select Actions
Through student information, all the unpaid fees are listed here. In the action column add fees and print options are available.

4. Add Fees
By clicking the add fees option, super admin will get the add fees page. Where date, amount, discount group, discount, fine and payment mode is required.
Search Fees Payment
eSkooly Search Fees Payment

1. Search Fees Payment
To search fees payment, have to select the payment id.
2. Select Actions
Search result will show the selected payment id's all payment information. User can view the details information by clicking the view option in action column.

3. Print
In view page, the payment details are shown in the list. Print option is available in this list.
Fees Master
eSkooly Fees Master

1. Add Fees Master
To add fees master, fees group, fees type, date and amount are required.
2. Select Actions
In the action column, assign/view and delete options are available.

3. Search Fees Assign
By clicking the assign/view, super admin can enter the fees master assign page. Where super admin can able to assign the fees group.
Fees Group
eSkooly Fees Group

1. Add Fees Group
To add fees group, name is required. The fees group represents which kinds of fees should have to pay by students.
2. Select Actions
In the fees group list, edit and delete is available.
Fees Type
eSkooly Fees Type

1. Add Fees Type
To add fees type, name and fees code are required. The fees group represents which types of fees should have to pay by students.
2. Select Actions
In the fees discount list, edit and delete is available.
Fees Discount
eSkooly Fees Discount

1. Add Fees Discount
To add fees discount, name, discount code, type and amount are required. The fees discount represents how much discount will be provided for student in which purpose.
2. Select Actions
In the fees discount list, assign fees discount, edit and delete is available.

2. Search Fees Discount For Assign
By clicking the assign, super admin can enter the fees discount assign page. Where super admin can able to assign the fees discount.
Fees Carry Forward
eSkooly Fees Carry Forward

1. Search Fees Carry Forward
To search the fees carry forward, super admin have to select class name and section.
2. Previous Session Balance Fees
Search result will show the previous session balance fees. In this list particular student's balance are shown. Here, super admin can add balance for students.
Upload Content
eSkooly Upload Content

1. Upload content
To upload content, content type, available for which kinds of person, date the file you want to upload.
1. Select Actions
The uploaded content are listed in upload content list. In this list, user can delete and download the content.
Assignment
eSkooly Assignment

1. Assignment List
The uploaded assignment will be shown in the assignment list.
2. Select Actions
Delete and download options are available in the action column.
Study Material
eSkooly Study Material

1. Study Material List
The uploaded study material will be shown in the study material list.
2. Select Actions
Delete and download options are available in the action column.
Syllabus
eSkooly Syllabus

1. Syllabus List
The uploaded syllabus will be shown in the syllabus list.
2. Select Actions
Delete and download options are available in the action column.
Other Downloads
eSkooly Other Downloads

1. Other Downloads List
The uploaded other download materials will be shown in the other download list.
2. Select Actions
Delete and download options are available in the action column.
Student Admission
eSkooly Student Admission


1. Import Student
For importing new student, super admin have to click the import student button.
2. Add Parents
For adding new student, super admin have to fill up all the major and pros and cons information. In this case, if new student has any sibling then super admin can able to add the sibling by clicking Add Parents button.
3. Relation With Guardian
Who will take the responsibility that have to include in this form. Before admin super admin have to specify the relation with the student.
4. Add Student
After adding all the information correctly then super admin can able to add the new student by clicking the save student button.

5.Download Sample File
Before import new student information, by clicking the download sample file, super admin can download the sample student information excel file.
6.Student Import
For import external information file, super admin have to select the class, section and attach the excel file.
1. Bulk Import of Students
Students can be imported from a csv file for adding multiple students at a time. Form the admin panel, under the menu student information, you can get a sub menu 'Student Admission'.
2. Add Parents
3. Relation With Guardian
4. Add Student/ Admission
Admitting new students to the school can be done from ‘admit student’ submenu under ‘student’ in the navigation. For adding a student, admin will need to fill up the information required and provided by the admission form. It should be kept in mind that, admitting new student will automatically create an enrollment in the running session for the selected class. Check and recheck the information you have inserted while adding student because once you admit him/her to a class, you will not be able to change his/her class without promoting him/her to the next session.
4.Download Sample File
4.Student Import
Clicking there will lead you to a new page. The method of importing is cited on that page. Follow those to successfully import students using a csv file.
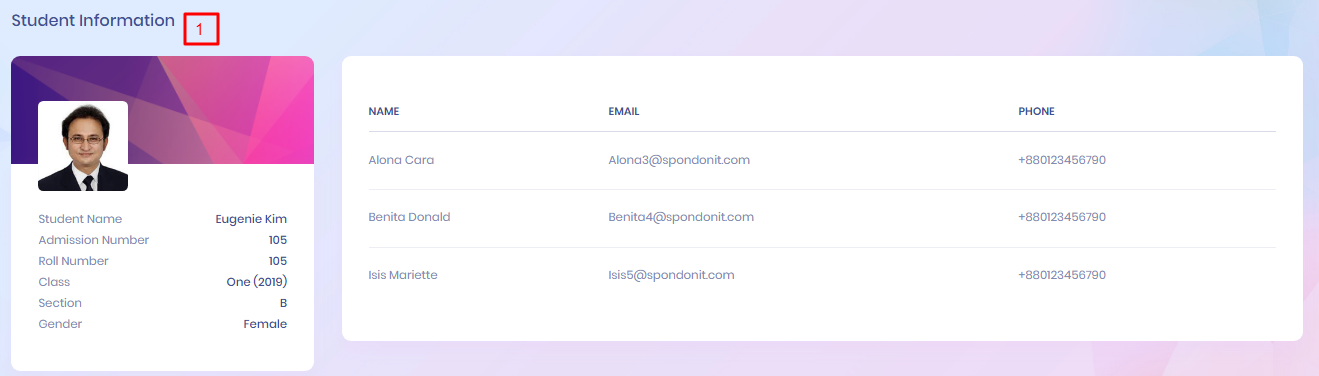
Student List
eSkooly Student List
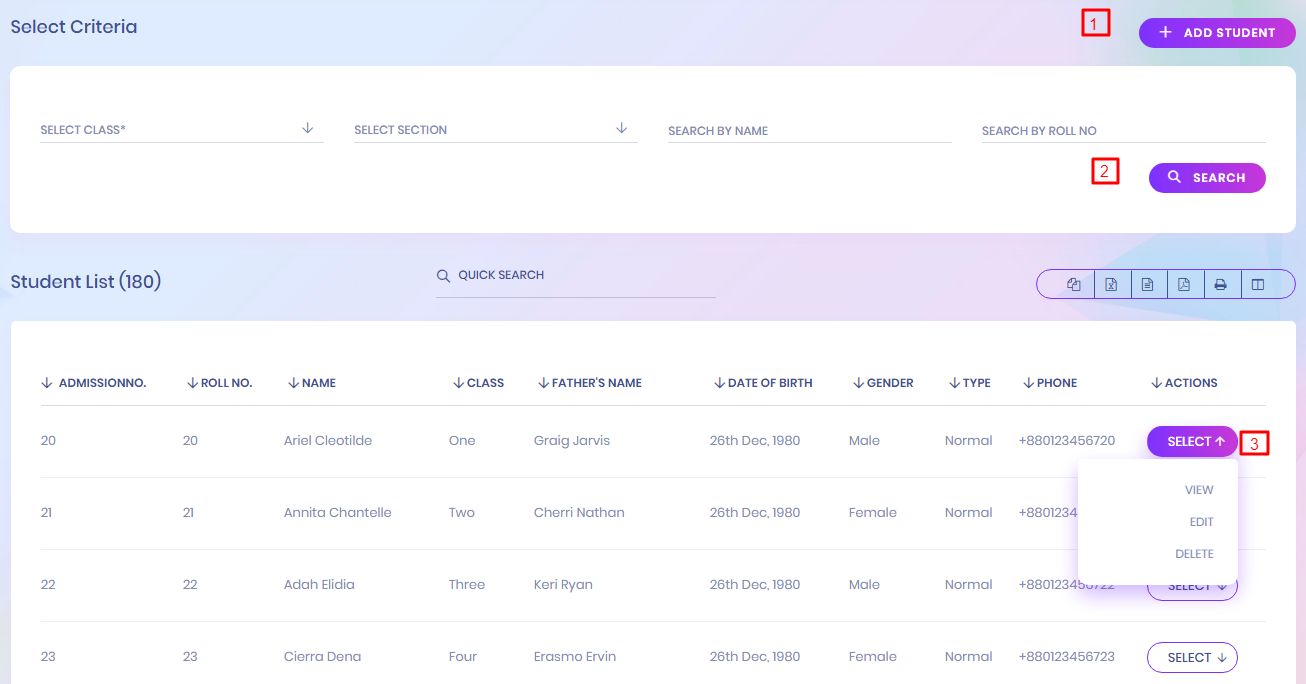
1. Add Student
To add a new student, just click the right-top add click button.
2. Search Student
For searching the individual student have to select the class, section, student name or student roll id. By selecting the class and it's section can able to see the particular section's student list.
3. Select Student
In the list, view student's detail information,edit and delete are included in action column.

4. Student Details
By clicking the view option in action column, super admin can enter the student's details information page. Where he can able to see the student's details information in different classification.
5.Sibling Information
Sibling information is also included in this student detail information page.
6.Student Profile
Student information is classified in different section, student profile is one of them. All the personal information are shown in this student profile section.
7.Edit Student
If wants, it's possible to edit the student information by clicking the top-rightedit button.

8.Student Fees
All the particular student fees information are shown in this portion.

9.Document
All the particular student all the document information are shown in this document portion.

10.Timeline
All the particular student's timeline information are shown in this timeline portion.
11. Add Timeline
Add timeline option is available in the timeline page.
Student Attendance
eSkooly Student Attendance

1. Search Student Attendance
To search the student attendance, class, section and the attendance date. Daily attendance is shown on the menu class wise. For taking or viewing attendance for a particular class, firstly admin will need to select the date and the section which will bring the attendance managing form for that class section for that particular date.
2. Mark Holiday
If the searched day is holiday then super admin can able to mark the day as holiday by check the mark holiday button.
3. Save Attendance
Super admin can able to add attendance students. If anyone absent then check the absent, if present then check the present. Late and half day also can be checked.
Student Attendance Report
eSkooly Student Attendance Report
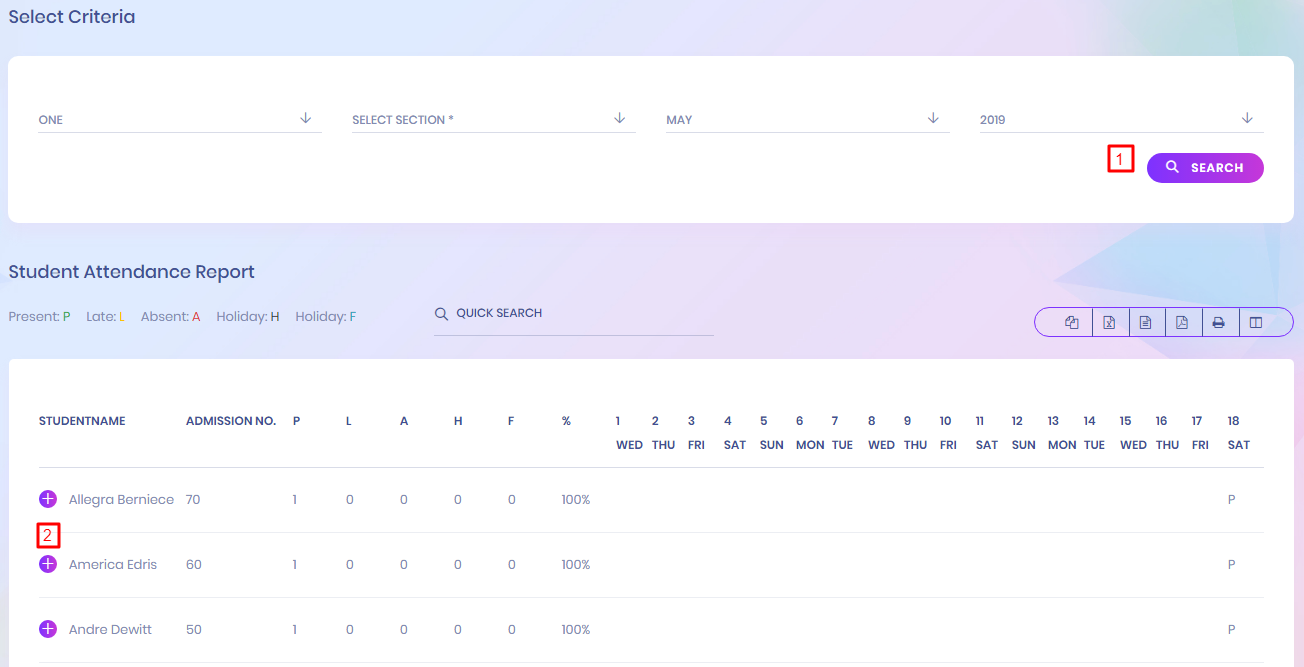
1. Search Student Attendance Report
To search the student attendance report, class, section, month and year should have to select.
2. Select Student for Report showing
The search result will show in this report. If wants to see the individual students attendance then just click on the '+' symbolic button then see the all the days of a month report.
Student Category
eSkooly Student Category

1. Add Student Category
For adding student category, student type have to added.
2. Select Actions
super admin can able to edit and delete the student category list.
Student Group
eSkooly Student Group

1. Add Student Group
For adding student group, student group name have to added.
2. Select Actions
super admin can able to edit and delete the student group list.
Student Promote
eSkooly Student Promote


1. Search Student Promote
To search student promote list, year and class have to select.
2. View Academic Performance
In the list, by clicking the view academic performance button, user can able to see the detail academic performance.
3. Student Promote
In the promote student in next session, After selecting the pass or fail, super admin have to select the promote session and promote class.
This module is designed to promote students of a particular class to the next class in the next session. ‘Student Promotion’ submenu will be found under the menu ‘student’ in the admin panel. To promote students to the next class, admin needs to select the present class of the students and the class where he/she wants to promote the students. The present session which has been already set from the system settings will be selected automatically as the present session and the next session will be automatically calculated by the software.
Disabled Students
eSkooly Disabled Students

1. Search Disabled Students
To search the disabled student list,class is required and if need to find the individual then the section, name and roll is needed.
2. Select Actions
In the disabled students list, super admin can view, edit and delete the list item.
Student Report
eSkooly Student Report

1. Search Student Report
To search the student report, have to select the class,section, student type, gender.
2. Student Report List
The search result is shown in student report list. Here student's all the major information are shown.
Guardian Reports
eSkooly Guardian Reports

1. Search Guardian Reports
To search the guardian report, have to select the class, section.
2. Student Guardian Reports List
The search result is shown in guardian report list. Here student's guardian all the major information are shown.
Student History
eSkooly Student History

1. Search Student History
For searching the student history, super admin have to select the class and admission year.
2. Student Report List
The search result is shown in student history list. Here student history are shown.
Student Login Report
eSkooly Student Login Report

1. Search Student Login Report
To search the student login report, have to select the class, the current section.
2. Student Login Info Report List
The search result is shown in student login report list. Here student can reset his password and his guardian as well.
Fees Statement
eSkooly Fees Statement


1. Search Fees Statement
For searching the student fees statement report, have to select the class, section, student name.
2. Student Fees Statement List
The search result is shown in student fees statement report list. Here, student's fees which are paid already and if has any discount that are also shown.
Balance Fees Report
eSkooly Balance Fees Report

1. Search Balance Fees Report
For searching the student balance fees report, have to select the class, section.
2. Student Fees Report List
The search result is shown in student balance fees report list. Here student's amount, discount, fine, paid fees, balance statement are shown.
2. Grand Total
Grand total is shown one section's amount, discount, fine, paid fees, balance total statement
Transaction Report
eSkooly Transaction Report
1. Search Transaction Report
For searching the student balance fees report, have to select from from date to date to.
2. Fees Collection Details
Fees collection detail list show particular date duration's fees collection information.
3. Income Result
Income result list show particular date duration's income detail information. Grand total show the total amount of income.
4. Expense Result
Expense result list show particular date duration's expense detail information.Grand total show the total amount of expense
Class Report
eSkooly Class Report


1. Search Class Report
For searching the class report, have to select class and it's section name.
2. Class Report for particular Class and Section
This report show the particular class's summary. Here includes class information, subjects, type of fees collection.
3. Statistic of Fees Collection
This graphical statistic represents the particular class's fees collection statement.
Class Routine Report
eSkooly Class Routine Report

1. Search Class Routine
For searching the class routine, have to select class and it's section name.
2. Class Routine List
The search result is shown in class routine report list. Here full week's per period assigned classes are shown.
Exam Routine
eSkooly Exam Routine

1. Search Exam Routine
For searching the exam routine, have to select examination name.
2. Exam Routine List
The search result is shown in exam routine report list. Here particular exam's full routine are shown.
Teacher Class Routine Report
eSkooly Teacher Class Routine Report

1. Search Teacher Class Routine Report
By selecting the teacher name, super admin can see the particular teacher's class routine.
2. Class Routine List
In this class routine, individual teacher's full week assign class are listed.
Merit List Report
eSkooly Merit List Report

1. Search Merit List Report
To see the particular section of a class, have to select the exam name, class name, section.
2. Merit List Report
Search result are shown the a class all student's merit list. Here, in ascending order of student position, lists are shown. Individual subject's mark, grade also inclued in this list.
Online Exam Report
eSkooly Online Exam Report

1. Search Online Exam Report
You can search online exam report. Search fields are exam term, class, and section
2. Result View
After searching the result view list are shown
Tabulation Sheet Report
eSkooly Tabulation Sheet Report

1. Search Tabulation Sheet Report
You can search tabulation sheet report. Searching fields are Exam type Id, Class, Section and student.
2. Student Terminal Report
After searching tabulation sheet, the tabulation sheet are shown in below.
Student Progress Report
eSkooly Progress Report

1. Search Progress Report
You can search student progress report
2. Progress Report List
After searching you can find student progress report list.
Student Fine Report
eSkooly Student Fine Report

1. Search Student Fine Report
You can search student fine report form between two date
2. Student Fine Report List
After searching you can find student fine report list.
User Log
eSkooly User Log

1. User Log list
This is onl for administrator, he can see the user loging history so that he can understand which user is active or not.
Student Profile
eSkooly Student Profile

1. Student Profile
Student can see his Profile,fees statement,examination,document and timeline.the profile includes personal information,parent,transport,dormitory, other information and so on.
Fees
eSkooly Fees

1. Add Fees
Fees statement lists are shown and if fees are not paid yet then student is able to pay his fees through Paypal and Stripe.
Class Routine
eSkooly Class Routine

1. Class Routine
Class routine are shown here. Class routine module has the capability to set routines section wise for a particular class. Admin can add, edit or delete any class routine and there is a print button associated with every class routine for printing
Homework
eSkooly Homework

1. Homework List
Homework list with complete and incomplete status are shown.
2. Select Action
Student can see the homework's full detail view in the action section.
Download Center
eSkooly Download Center
1. Search Collect Fees
Administrator/accountant can search to show their collecting fees from the student
2. Collect Fees
To collect fees, click here.
3. Select Actions
You can add fees or print data.
4. Add Fees
You can add fees fro here. There are four fields are required those are amount,discount group, discount & fine. There are three type of payment method has given. After giving all information of fees, then submit.
Attendance
eSkooly Attendance
1. Search Fees Payment
You can search fees by payment ID.
2. Select Actions
You can view more details
3. Print
You will able to print payment details.

1. Search Attendance
Student can search the student attendance.
2. Attendance Result
In this section attendance results are shown. Attendance result show the certain month attendance which is remarked by present(P),late(L),absent(A),Half Day(H) and Holiday(F)
Examinations
eSkooly Examinations
1. Add Fees Master
You can add fees master from here.
2. Select Actions
You can assign/view fees. You can also edit data from here.
3. Search Fees Assign
You can search fees assign.


1. Exam Result
Student can see his result.
2. Search Exam Routine
For exam schedule, student can search here.
3. Exam Routine List
Exam routine are shown here.
Online Exam
eSkooly Online Exam


1. Online Active Exams
Which exams are active that are shown here.
2. Take Exam
Student can take examination if they want.
2. Take Online Exam
After completion of online exam, student can submit his exam answer.
1. Upload Backup
Our system will help you to backup & restore your system. If you want to upload your database, then you can do it. But uploaded file must be sql file. Without sql file you can't upload it.
2. Images Backup
You can make whole image backup and download image as zip format.
3. Full System Backup
You can make whole full system backup and download as zip format. After downloading, you should delete system backup file from server.
4. Database Backup
You can take database backup and download.
5. Download
You can download from here
6. Restore
You can restore your backup
7. Delete
You can delete your backup
>>>>>>> Stashed changesNotice Board
eSkooly Notice Board

1. All Notice List
All the notice are listed here for student's acknowledgement.
1. System Status
It will show that current system version and upgrade version. Upgrade version always offers to you with new features, bug fixing. It will take you advance technology.
2. Update System
If update version is available, then you can upgrade from here. At first you have to read alert carefully, If you have to do anything, then do it before taking upgrade.
Subject
eSkooly Subject

1. Subject list
Assigned Subjects are listed here.Student can see those.
Teachers
eSkooly Teachers

1. Teacher list
Course teacher listed here.
Library
eSkooly Library


1. Book List
All Books which are available in the library are shown here.
1. All Issued Book List
Which books are issued for this student are shown here.
Transport
eSkooly Transport
1. Transport Route List
Student can see the transport routes with vehicle and also can see which are assigned for.
1. View Info
Full details of transport route are shown here.
Dormitory
eSkooly Dormitory

1. Dormitory Room List
Dormitory and it's room information with which room is assigned for the student is listed here.
Student Profile
eSkooly Student Profile


1. Student Profile
Parent Can See the Selected Student's Profile.
1. Create Homework
Administrator/Teachers can add homework for their students. After adding homework, students will get notification of their system panel.
- Compulsory fields for homework
- Class *
- Section *
- Subject *
- HomeWork Date *
- Submission Date *
- Marks *
- Description *
2. Update Homework
- Evaluation homework
- Edit homework
- Delete homework
3. Search Homework
Administrator/Teachers can search homework for their students homework
4. Add Homework
Administrator/Teachers can add homework for their students
4. Update Homework
5. Homework Evaluation
Here Teachers can create Homework for their Class-Section. After creating homework teachers can evaluate homework for class-section students that who has completed homework or not completed. First we will Add Homework then we will evaluate homework. Homework- Go to Homework > Add Homework Here you can see all previously created homework and search them different criteria.
Student Fees Statement
eSkooly Student Fees Statement


1. Student Fees Statement
Parent Can See the particular student's fees statement,fees status which is paid or not.
2. Select Actions
The action includes two online payment options such as Paypal and Stripe.
3. Collect Fees Online Via Card
Parent Can pay the fees through online via cards.
Student Class Routine
eSkooly Student Class Routine
1. Import Student
Administrator will able to import student. There is an Excel format for import student.
Student Admission
There are several inputs fields for student admission. We will discuss in below.
- Admission Number: This input field will increase automatically.
- Compulsory Fields
- Class: If the class list is empty, then you have to add class
- Section: If the section list is empty, then you have to add section
- First Name
- Gender: If the gender list is empty, then you have to add base setup
- Date of Birth
- Session: If the gender list is empty, then you have to add session
2. Add Parent
If a student have any siblings who are already admitted, then add parent of previous student.
3. Guardian
If gurdian without one of parents, you have to add guardian and input their relations between them
- Compulsory Fields
- Guardian Email: It is required because their login in this system to check their child's progress or lacking
- Guardian Phone: Phone number is must required.
4. Save Student Data
You can select Dormitory & Room Number.
You can select Transport Route, vehicle number, and driver name
5. Download Sample File
Before import excel file, you should download the sample file to know it's format.
6. Student Import
Before import excel file, you have to generate excel file according to our sample format, and follow our instruction which are given in above.

1. Student Class Routine
Parent can see the class routine of the particular student.
1. Class Routine
Administrator/Teachers can set Class Routine
2. Class Period
If class period is empty, then at first you have to class period. You can also modify class period.
3. Weekend
If weekend is empty, then at first you have to weekend. You can also modify weekend.
3. Set Class Routine
To set class routine, you have to select subject, teacher, and room number. Please see how to add subject , teacher , and room number
Homework list
eSkooly Homework list
1. Add Student
You can go add a student from here.
2. Search Student
You can search student list
3. Select Student
You can view, edit, delete of the student.
4. Student Details
5.Sibling Information
6.Student Profile
7.Edit Student
8.Student Fees
9.Document
10.Timeline
10.Add Timeline

1. Student Homework list
Parent can see the student's homework list.
1. Select Action
Particular homework view in the action option.
1. Assign Subject
To set assign subject, you have to select subject, teacher, and room number. Please see how to add subject , teacher.
2. Search Assign Subject
Administrator will able to search assign subject.
Student Attendance
eSkooly Student Attendance

1. Search Attendance
Parent can search the student attendance.
2. Attendance Result
In this section attendance results are shown.Attendance result show the certain month attendance which is remarked by present(P),late(L),absent(A),Half Day(H) and Holiday(F)
Notice Board
eSkooly Notice Board

1. All Notices
Parent can see the notice list which is selected for parents.
Subjects
eSkooly Subjects

1. Student assigned Subjects
Parent can see which subjects are assigned.
Teacher List
eSkooly Teacher List
1. Student assigned Teacher List
Parent can see the teachers list whom are assigned.
Transport List
eSkooly Transport List
1. Student Transport List
Parent can see the transport route and assigned vehicle.
Dormitory
eSkooly Dormitory

1. Student Assigned Dormitory
Dormitory list and assigned dormitory are seen in this module.